
If you’re a PC enthusiast or a gamer looking to get the most out of your memory, you’ve like Enable XMP on MSI and heard of XMP (Extreme Memory Profile). XMP allows you to unlock the full potential of your RAM, ensuring it operates at its optimum speed and timings as specified by the manufacturer, rather than the standard settings defined by the motherboard. In this guide, we’ll walk you through how to enable xmp msi motherboards, a popular choice among PC builders for their reliability and performance.
What is XMP?
XMP, developed by Intel, is a technology that lets you automatically set the memory modules to their rated speeds, timings, and voltage, without the need for manual tuning. This is particularly useful as memory modules often come with the capability to run at higher speeds than the default settings enforced by the motherboard’s BIOS.
Why Enable XMP?
Enabling XMP can significantly enhance system performance, especially in memory-intensive tasks and applications like gaming, video editing, and 3D rendering. It ensures that your RAM operates at the best possible speeds it is capable, rather than running at lower speeds set by default.
Preparing to Enable XMP on MSI
Before you dive into your BIOS settings, it’s important to make sure your system is ready for the change:
- Update Your BIOS: Check your motherboard’s manufacturer’s website for any BIOS updates. MSI often releases updates that enhance compatibility and system stability.
- Check Memory Compatibility: Ensure your RAM is XMP-capable. Most high-performance RAM comes with XMP profiles built in.
- System Stability: Be prepared to perform stability tests after applying XMP settings to ensure that your system remains stable under load.
Enabling XMP on an MSI Motherboard
Now, let’s go through the steps to enable XMP in the BIOS of an MSI motherboard:
Step 1: Enter the BIOS
To enter the BIOS setup, restart your computer and press the “Del” key repeatedly right after powering on the system. For some MSI motherboards, you might need to press the “F2” key instead.
Step 2: Navigate to the XMP Setting
Once inside the BIOS:
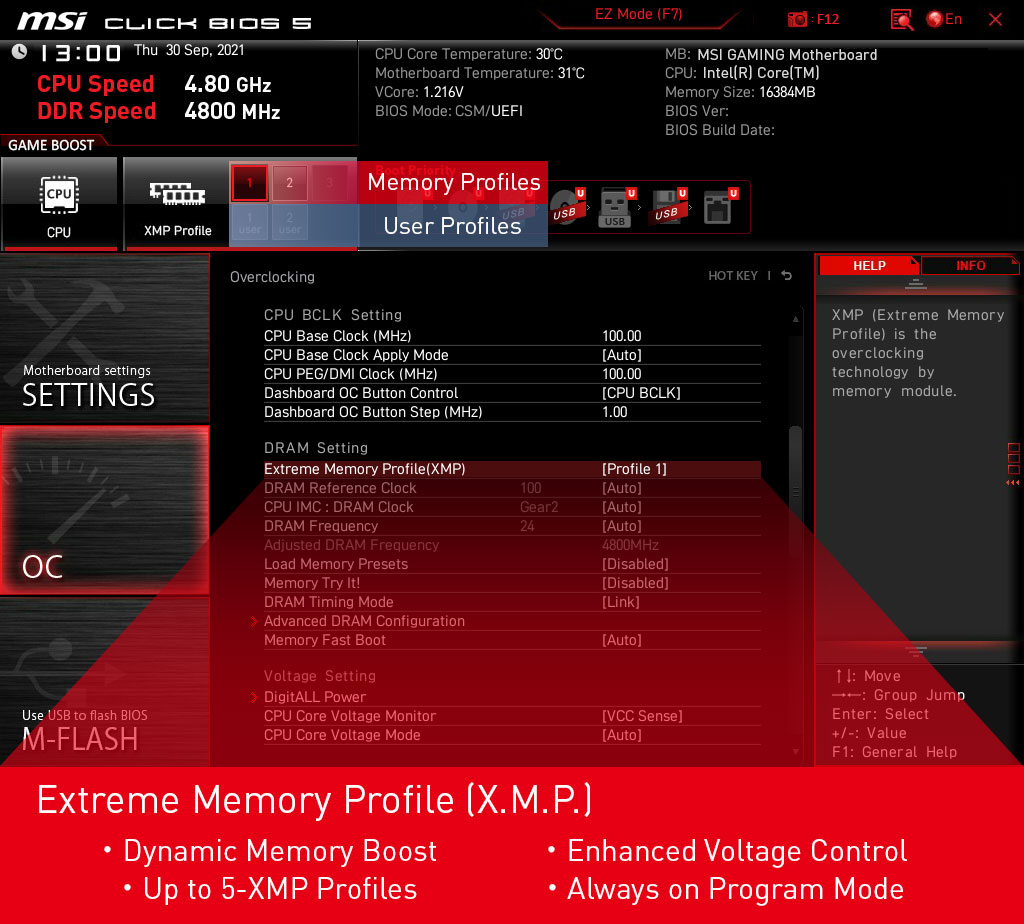
- Look for the OC (Overclocking) Menu. MSI typically organizes its BIOS settings under this menu for high-performance tweaks.
- In the OC Menu, you’ll find the XMP option. It might be referred to as A-XMP, Memory Try It!, or simply XMP Profile depending on your motherboard’s BIOS version and chipset.
Step 3: Enable XMP
- Select the XMP option. You will generally have a choice between different profiles if your RAM supports multiple configurations. Profile 1 is usually the most common and aligns with the advertised speed of the RAM.
- Choose the profile that suits your needs or matches the specs of your RAM.
Step 4: Save and Exit
- After selecting your desired XMP profile, navigate to the Save & Exit menu which is often found at the bottom or top of the list in the BIOS menu.
- Select Save Changes and Reset or a similarly named option to apply the changes and reboot your system.
Post-Enablement: Stability Testing
After enabling XMP and rebooting your system, it’s important to ensure that your system is stable with the new memory settings:
- Run Stability Tests: Use tools like Prime95, MemTest86, or AIDA64 to stress test your memory and CPU. These tools can help ensure that the system runs reliably under load.
- Monitor Temperatures: Keep an eye on your system temperatures to ensure that the increased performance does not lead to excessive heat buildup which could impact system stability and longevity.
- Check System Performance: Finally, observe if there is an improvement in system performance. You might notice quicker load times, better frame rates in games, or smoother performance in intensive applications.
Troubleshooting
If you encounter issues like system crashes, freezes, or Blue Screen of Death (BSOD), consider:
- Updating the motherboard firmware to the latest version.
- Trying a different XMP profile or manually adjusting the memory frequency and timings.
- Ensuring that the system cooling is adequate.
Enabling XMP on your MSI motherboard can significantly enhance the performance of your system by optimizing the operation of your memory. With these steps, even beginners can safely apply these settings and enjoy a noticeable improvement in their system’s responsiveness and speed. Remember, while XMP is designed to be safe and effective, every system is different, and some tweaking might be necessary to find the best settings for your particular setup.